headerchop.jpg

11.27.2013

Canadian Thanksgiving


Thanksgiving is fast approaching, so to get everyone in the mood I thought I would share with you how I celebrated Canadian Thanksgiving which was in October.  For you Americans wondering what is Canadian Thanksgiving, the answer according to Wikipedia is:
On Thursday, January 31, 1957, the Canadian Parliament proclaimed: A Day of General Thanksgiving to Almighty God for the bountiful harvest with which Canada has been blessed – to be observed on the 2nd Monday in October."
So in conclusion, I would say that it’s a day to celebrate how grateful we are for food.  I’m in!

Being away from my family, I’ve had to find a new way to celebrate with my own traditions.  Last year my "male roomie" and I hosted a potluck Thanksgiving.  We invited our orphan Canadian friends (and sprinkled in a few Americans) and it turned out to be a hit, so we decided to make it an official tradition!  

I’m not going to lie, I was a little nervous about hosting this year because we upped the guest list from 14 (last year) to 20 (this year).  I loved the idea of having all our friends over, but sometimes I get anxiety when I think about making sure 20 people are fed & happy - but the show must go on!  


If you are ever planning on hosting a big dinner, let me tell you, a pot luck is the way to do it!  The pressure is off of the host to make multiple dishes and also everyone gets to bring their secret family recipes.  My "male roomie" made a huge 20 pound turkey and I made a vegetarian meat loaf (it was not 20 pounds).  Everyone else volunteered to bring their favorite dish and voila, you have a complete meal.

While the bird was finishing, I had a signature cocktail for everyone.  I decided on Moscow Mules because they are light, crisp, refreshing & easy to make.  It’s also delicious “virgin” style for those who didn’t want any alcohol.  

One of my favorite traditions when we have friends over is to leave my Instax camera out so everyone can snap some photos.  It's a fun way for everyone to document the night and is always entertaining to look at the next morning.  


When the bird was finally ready, we all lined up in the kitchen to pile up our plates with way too much food.


I was so impressed with my friends' wicked awesome chef skills.  There was not a single Sad Sally dish.  Not one!  On top of the bird/vegetarian meatloaf we had everything from brussel sprouts, broccoli casserole, mashed potatoes, sweet potatoes, stuffing, cranberry sauce, biscuits, gravy, multiple salads, and so much more.  Unfortunately I didn't get any photos of the food because once it was put out, we all turned into vultures and it was gone.


And don’t get me started with dessert.  We had pumpkin pie, homemade brownies, cookies and my friend Dan’s signature dessert, monkey bread.  He had some technical difficulties with the pan which resulted in sugar burning in the oven and a whole lot of smoke!  

Amber brought the most delicious Nanaimo bars and mouthwatering butter tarts (both Canadian inspired treats).  They were so good that people were talking about them after she left.  If you ask nicely, I'm sure she will share the recipe with you.


One of the highlights of the night for me may sound strange, but it was when my friends Carly and Justin pulled out a vintage tube of Pogs.  Remember Pogs?  Those small discs of cardboard turned a group of grown men into young giddy boys.  


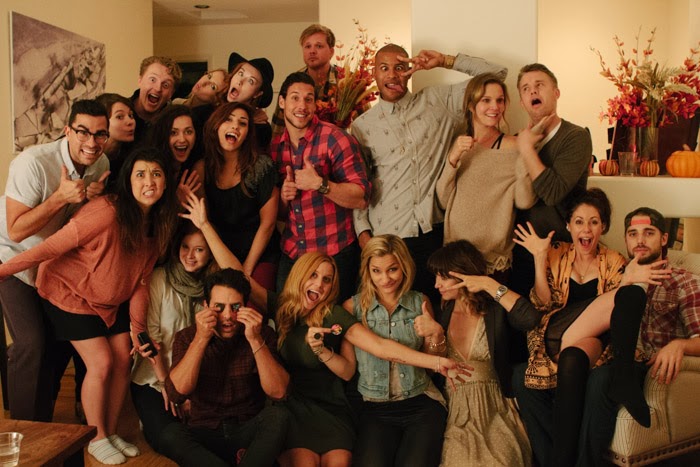
And what Thanksgiving would be complete without a family portrait?  
I’m so grateful to have a such an awesome group of friends in my life.  The coolest part for me was seeing a bunch of people from different circles get along so well.  It was as if they had all been friends forever.  A true sign of solid gems.  

We hope that you have an amazing Thanksgiving filled with plenty of delicious food & your own fun traditions!


11.25.2013

Mini Pumpkin Donuts with Cinnamon Sugar Dusting & Maple Glaze

No one wants to be the one scrambling last minute to find a dessert to bring to the big Thanksgiving dinner, especially when it results in a mad dash to the grocery store for the last pumpkin pie.  With Thanksgiving fast approaching, we thought we would share with you some dessert ideas that go beyond your average store-bought pumpkin pie.  Last week, Amber shared with you a recipe for the most delicious pumpkin spice chocolate chip cookies (seriously, they are amazing) and we figured it wouldn't be a Granny Girls Thanksgiving without pumpkin inspired mini donuts.  That’s right, mini pumpkin donuts!  These bad boys are SCRUMPTIOUS!  I might even like them better than my regular go-to mini donut recipe **Gasp!**  If you are going to any holiday dinners, these make the perfect transportable treat.  Or if you are a homeless Sally on Thanksgiving like me, they make the perfect comfort dessert.  Either way, these will satisfy your sweet tooth and pumpkin cravings!

When it comes to mini donut recipes, I trust only one girl and that is the talented Angela from Oh She Glows. Usually when I’m making a recipe, I alter it a bit according to my tastes or allergies, but this is never the case with Angela’s recipes.  They are perfect!  So full credit goes to Angela and zero to me.  

The only thing I changed from her original recipe was the flours.  In her recipe it called for 1 cup all-purpose four and 1/2 cup pastry flour, but I didn't have any pastry flour.  Instead I just used all-purpose flour and it turned out great.  I also added a second option for a maple glaze.  I did half my batch with the cinnamon sugar dusting and the other half with the maple glaze.  I personally like the glaze better but my "male roomie" preferred the cinnamon sugar, so feel free to get crazy & make both kinds to please all tastebuds. 

Side note: if you are looking for a good mini donut pan, we got ours at Bed Bath and Beyond (hello 20% off coupons), but Amazon also carries them

Mini Pumpkin Donuts 


Ingredients

  • 1/2 tsp apple cider vinegar (white vinegar may work)
  • 6 tbsp almond milk
  • 1/2 cup canned pumpkin
  • 1/4 cup white sugar
  • 3 tbsp applesauce
  • 2 tbsp brown sugar
  • 2 tbsp Earth Balance (or other non-dairy butter substitute), melted
  • 2 tsp baking powder
  • 1/4 tsp baking soda
  • 1.75 tsp pumpkin pie spice
  • 1/2 tsp salt
  • 1 1/2 cup all-purpose flour

Cinnamon Sugar Dusting

  • 1/4 cup Earth Balance (or other butter sub), melted
  • 1/2 cup sugar
  • 1 tsp cinnamon (I ended up adding more cinnamon because I like it super cinnamony)


Maple Glaze

  • 1 1/2 cups powdered sugar
  • 1/2 teaspoon maple syrup
  • 1/2 teaspoon cinnamon
  • 3 tablespoons almond milk

Directions


1.  Preheat oven to 350F. 

2.  Place the vinegar, milk, pumpkin, sugar, applesauce, brown sugar and melted Earth Balance in a large bowl and mix together.

3.  Add in in the baking powder, baking soda, spices, salt, and flour. Mix until there are no clumps.

4.  Pour the batter into a large freezer bag and cut off one of the bottom tips.  Pipe the batter into a well greased mini donut pan.  

5.  Bake for about 10 minutes at 350F.  They’re ready when you touch them and they bounce back.  Let them cool down and then flip the pan over and they should fall out.  I usually have to hit the back of the pan to get the last few stubborn ones out.


6.  To finish them with the cinnamon sugar dusting, pour the cinnamon and sugar into a paper bag/freezer bag.  Dip the donuts one by one into the melted earth balance, then toss into the cinnamon sugar bag and shake until they are coated.  Or if you want to take pretty pictures like me, you can just put the butter dipped donut in the bowl and cover it with the cinnamon sugar mix.


7.  To finish them with the maple glaze, add the powdered sugar, maple syrup, cinnamon and milk in a bowl and mix well with a fork.  Dip one side of the donut into the glaze and let set. 


I found the donuts tasted best the day that I made them.  They were still delicious the next day but they had a fresher texture the day of, so try and make them the same day that you want to devour them (in my case this was not hard to do).


Let us know if you bring these mini pumpkin delights to your Thanksgiving and which one was the winning topping!


11.22.2013

Hanukkah Latkes


With Hanukkah on the horizon we wanted to post a traditional Jewish recipe, so our good friend Erin came over and taught us how to make latkes!  For those of you who don't know, latkes are a fried potato pancake.  They are a Hanukkah tradition because the oil that they are cooked in represents the miracle of the oil that lasted for eight days. Apparently there are many different ways to make latkes.  Even within Erin's family some people add carrots, some add parsley, some argue that you shouldn't add either (and Erin's grandma was apparently horrified that we didn't cook them in chicken fat).  So we decided to make an assortment.  The ratio of ingredients for latkes also varies widely.  Erin told us that "you don't usually measure, you just add stuff" but for the purposes of this blog (and for those of us who feel more comfortable following a recipe) we've given specific ingredient amounts below.  Just know that if you want to add more (or less) potatoes or an extra onion or carrot, they will turn out just as great.

We served them with sides of horseradish, applesauce & sour cream - and believe it or not, all three piled on together taste amazing!


Ingredients


  • 4-6 russet potatoes
  • 1 large onion
  • 2 carrots
  • fresh parsley
  • 2 eggs
  • 1/4 cup flour
  • 1 tsp. salt
  • 1/4 tsp. pepper
  • canola oil 
  • sides of horseradish, applesauce and/or sour cream (we recommend all 3!)
  • a cheesecloth (optional but highly recommended)


Directions


1.  Invite friends over to cook with you (and enjoy morning coffee).


2.  Pre-heat your oven to 250 F. so you can keep your cooked latkes warm between batches.

3.  Peel your potatoes & grate them into a big bowl.  If you have a food processor with a grating blade, use it because it works like magic!


4.  Peel & grate your onion into the same bowl.


5.  Send your friend/photographer Amanda outside if the grated onions are burning her eyes and she can't stop crying.  She can watch from the window.


6.  Using your cheesecloth (if you don't have one you can also use a clean tea towel or a colander over the sink), take handfuls of the potato/onion mixture and squeeze out as much liquid as you can.  The goal is to get the mixture as dry as possible so that the latkes fry up nice & crispy.


7.  Now you can add your grated carrot & finely chopped parsley to the mix.  

8.  In another bowl, whisk together your eggs, flour, salt & pepper.  Pour into potato/onions & mix everything together really well (you can get your hands in there for this part if you like!).

9.  Now it's time to cook them!  Using your hands, tightly press the mixture into 1-2 inch balls.  Pour about 2 tablespoons of oil into your frying pan and crank the heat (med to high).  If you have a cast iron frying pan it's going to be your best option because it will heat up really well and get your latkes nice & brown.  We also had a non-stick pan going and the cast-iron latkes cooked a lot quicker - but either will work.


10.  Once the oil is nice & hot, add as many latkes as will fit and use a fork to press them flat.  Fry for a couple minutes on each side until they are a nice golden brown & crispy around the edges.  Drain on paper towels and place on baking sheet in oven to keep warm.


11.  Repeat with remaining mixture, adding more oil to your pan as needed.


12.  Serve warm with horseradish, sour cream & applesauce.  


13.  Enjoy with good friends.  Happy Hanukkah!


11.20.2013

Pumpkin Spice Chocolate Chip Cookies


I made these cookies after finding one in a little bakery in Santa Barabara that was AMAZING and needed to be replicated immediately.  They are cakey and fluffy (kind of like little muffin tops) and are not too sugary so they pair perfectly with your morning coffee.  The chocolate chips add some sweetness and the spices are heavenly.  Bake these immediately and be very excited whenever you wake up in the morning.


Ingredients


  • 2 1/2 cups all-purpose flour
  • 1 tsp. baking powder
  • 1 tsp. baking soda
  • 2 tsp. cinnamon
  • 1/2 tsp. nutmeg
  • 1/2 tsp. cloves
  • 1 tsp. pumpkin pie spice (optional)
  • 1/2 tsp. salt

  • 1/2 cup butter (at room temperature)
  • 3/4 white sugar
  • 3/4 cup brown sugar
  • 1 cup canned pumpkin puree
  • 1 egg
  • 1 tsp. vanilla extract
  • 1-2 cups chocolate chips


Directions


1.  Preheat your oven to 350 degrees F.

2.  Combine dry ingredients (flour, baking powder, baking soda, cinnamon, nutmeg, cloves & salt) in a large bowl and mix well.

3.  In a separate bowl (use a stand or hand mixer if you have one) cream together the butter and white & brown sugars until fluffy.  

4.  Add the pumpkin purée, egg, and vanilla and beat until well mixed & creamy.

5.  Slowly stir in your dry ingredients a bit at a time (by hand or using the stir setting on your mixer).  Mix until just incorporated (don't over mix or your cookies won't be as fluffy).

6.  Fold in chocolate chips (Use as many as you like!  White chocolate chips would probably be amazing as well.  I plan on trying this sometime).

7.  The dough will be pretty sticky.  If you want you can refrigerate your bowl of dough for about 15 minutes and this will make it easier to work with, but if you're in a rush then don't worry about it.  Spoon balls of dough onto cookie sheet (just eyeball it - mine were about the size of those tiny mandarin "cuties").

8.  Bake for about 15-20 minutes.  They're done when they're starting to turn a warm golden brown.


11.18.2013

Amanda's Fall Favorites

So I don't want to freak anyone out, but yesterday when I was driving home from Amber's, I was listening to the radio and they were playing Christmas music.  Some of you may be rolling your eyes, and some of you may be doing a happy dance.  I'm doing a very enthusiastic happy dance!  Amber and I have been listening to the Pandora Christmas station for the past few weeks while we are crafting, so it was a no brainer for me to crank the volume and sing at the top of my lungs.

Back to reality, it's fall.  Last week Amber posted her fall Favorites, and now it's my turn to share with you my list.  My list is a combo of things I love for fall and things I want for fall.  It's a wish-fav or a fav-wish list.  Your choice.


1. Campomaggi Lavata Shoulder Bag: Fall usually means more hibernation in coffee shops and this is the perfect bag to carry your notebooks and computer in.  I've been trying to find the perfect shoulder bag to carry all my work stuff in and I think this one takes the cake.

2.  FIORENTINI + BAKER Buckled Ankle Boot: The perfect boot for wearing with skinny jeans or a dress with some slouchy socks.  I first spotted these when I was working on a TV show.  They were the lead actress' signature boots and looked so bad ass.  They appear super structured online, but you can break down the front part so that they hang over and look much more relaxed.  Perfection.

3. Texsport Enamel Mugs: These mugs stir up cozy thoughts of sitting in a fog-filled field in the morning, surrounded by nothing but trees and grassy knolls while enjoying a hot cup of coffee.  Maybe I took that a little far, but they certainly do make me feel rustic even if I enjoy them while sitting in the comfort of my own home.

 4. David’s Organic Cinnamon Rooibos Chai Tea: If you are a big tea drinker, then you should be checking out David’s Tea.  They have over 150 kinds of tea, everything from organic peppermint tea to their more decadent teas like red velvet cake tea.  And they are Canadian.  Winning!  For fall, this tea is the perfect combo of cinnamon, cloves, orange and honey.

5.  Pendleton Blanket: With the sun going down earlier in the day, it’s pretty much a requirement to have more movie nights.  What better way to curl up than with a cozy, rustic blanket?  These bad boys have been around for over 100 years, so they obviously know what they are doing.  The hardest part is choosing what design you like best.

6.  Cuisinart EasyPop Hot Air Popcorn Maker:  Along with movie nights, comes popcorn.  You can thank Amber for this gem.  She just bought one and since it was on sale from $75 to $39, I had to join her.  Stay tuned for a special recipe involving this fun machine.

7.  Le Labo Santal 26 Candle: I’m a huge fan of Le Labo.  They are a vegan and cruelty free fragance company that makes all their perfumes in house.  Some of their scents have been perfected over the course of 2 years.  This is actually the signature scent at the Gramercy hotel in New York and I’m addicted to it.  It's definitely the perfect candle for fall with its mix of sandalwood, cedar and violet.

8.  Leather Trimmed Rancher Hat:  I love to wear hats in the fall and have been on the hunt for the perfect one.  After searching for almost a year, I settled on this one and let me tell you it's everything I've been looking for in a fall hat.  I love the deep berry color and at under $50, the price is right too!

What's on your fall favorites?

11.15.2013

Fabric Covered Notebooks


Amanda and I are both big fans of the "To Do List".  At any given time I will have multiple lists going: one in my phone, one on my computer, one (or more) on a pad of paper somewhere...  Then, at some point when it all gets too crazy, I will collect all of my lists and amalgamate them into one giant list (usually in a notebook) that I carry around until everything is done.  Then the cycle begins again.

Now that Granny Girls is up & running and we're constantly jotting down craft & recipe ideas, there is an even greater need for a place to keep everything organized.   We love pretty notebooks but they can get expensive - especially when you're tearing out pages all the time - so we decided to make our own!  We bought these notebooks at Target (but you can get them at most office supply stores) for under two dollars apiece.  Then we picked up some cute fabric and, using a little Mod Podge (just like with our Polaroid Coasters), gave them brand new covers.  The whole project only costs a few dollars, is super quick to complete and you end up with your very own, personalized notebooks!  To Do List heaven.


Supplies:

  • Your choice of notebooks (we used these)
  • Mod Podge (available at most craft stores)
  • A foam brush (a large paintbrush will also work)
  • Some pretty fabric (1/2 a yard will cover around 3-4 notebooks)
  • Fabric chalk or pencil (or you can use a regular pencil)
  • A long ruler
  • Scissors (or a rotary cutter if you have one!)

Steps:


1.  Cut a piece of fabric that is slightly larger than your notebook.


2.  Using your fabric chalk (or pencil) and a ruler, draw a straight line down the center of your piece of fabric.  Then cut in half along line.  This edge is going to line up with your binding so cut it as straight as you can.  (This is where a rotary cutter would come in handy if you have one!)


3.  Now, using your foam brush, paint the front cover of your notebook (except for the binding) with a thin layer of Mod Podge.  Line up the straight edge of your fabric with the edge of your binding & press down.


4.  Trim fabric around the edges so you have nice clean lines with about an inch of overhang.  We also trimmed the corners.

5.  Paint on a little Mod Podge and fold the corners in first.


6.  Then do the sides (we also painted a layer of Mod Podge over top of our folded edges to really stick them down).


7.  Use your other piece of fabric and do the same thing to the back cover.  Let dry.  You now have the prettiest notebooks around! 


How easy was that?